正文
javascript
// Vue实例化
new Vue({
  el: '#app',
  data() {
    return {
      a: 111,
    }
  },
  // render(h) {
  //   return h('div',{id:'a'},'hello')
  // },
  // template:`<div id="a">hello</div>`
})
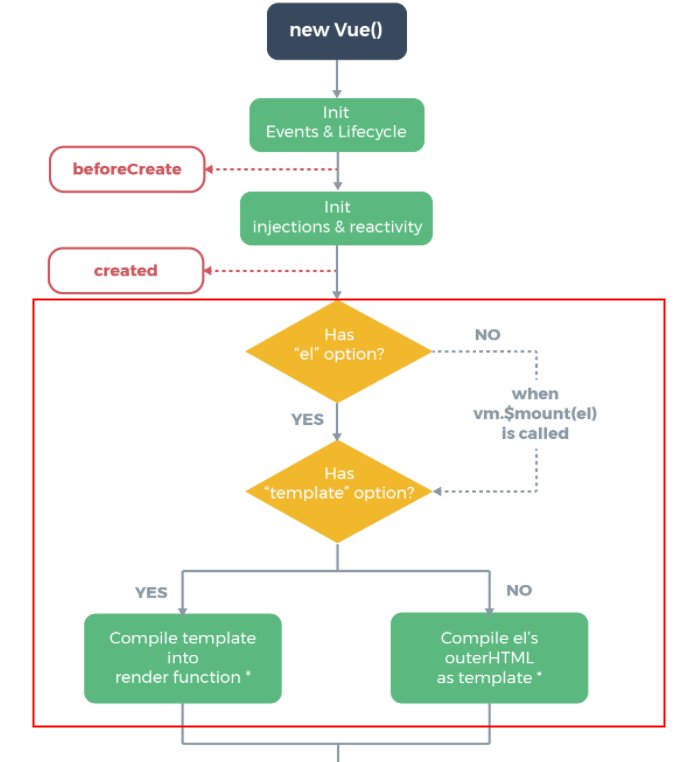
上面这段代码 大家一定不陌生 按照官网给出的生命周期图 咱们传入的 options 选项里面可以手动配置 template 或者是 render
注意一:平常开发中 我们使用的是不带编译版本的 Vue 版本(runtime-only)直接在 options 传入 template 选项 在开发环境报错
注意二:这里传入的 template 选项不要和.vue 文件里面的<template>模板搞混淆了 vue 单文件组件的 template 是需要 vue-loader 进行处理的
我们传入的 el 或者 template 选项最后都会被解析成 render 函数 这样才能保持模板解析的一致性
1.模板编译入口
javascript
// src/init.js

import { initState } from './state'
import { compileToFunctions } from './compiler/index'
export function initMixin(Vue) {
  Vue.prototype._init = function(options) {
    const vm = this
    // 这里的this代表调用_init方法的对象(实例对象)
    //  this.$options就是用户new Vue的时候传入的属性
    vm.$options = options
    // 初始化状态
    initState(vm)

    // 如果有el属性 进行模板渲染
    if (vm.$options.el) {
      vm.$mount(vm.$options.el)
    }
  }

  // 这块代码在源码里面的位置其实是放在entry-runtime-with-compiler.js里面
  // 代表的是Vue源码里面包含了compile编译功能 这个和runtime-only版本需要区分开
  Vue.prototype.$mount = function(el) {
    const vm = this
    const options = vm.$options
    el = document.querySelector(el)

    // 如果不存在render属性
    if (!options.render) {
      // 如果存在template属性
      let template = options.template

      if (!template && el) {
        // 如果不存在render和template 但是存在el属性 直接将模板赋值到el所在的外层html结构(就是el本身 并不是父元素)
        template = el.outerHTML
      }

      // 最终需要把tempalte模板转化成render函数
      if (template) {
        const render = compileToFunctions(template)
        options.render = render
      }
    }
  }
}
咱们主要关心$mount 方法 最终将处理好的 template 模板转成 render 函数
2.模板转化核心方法 compileToFunctions
javascript
// src/compiler/index.js

import { parse } from './parse'
import { generate } from './codegen'
export function compileToFunctions(template) {
  // 我们需要把html字符串变成render函数
  // 1.把html代码转成ast语法树  ast用来描述代码本身形成树结构 不仅可以描述html 也能描述css以及js语法
  // 很多库都运用到了ast 比如 webpack babel eslint等等
  let ast = parse(template)
  // 2.优化静态节点
  // 这个有兴趣的可以去看源码  不影响核心功能就不实现了
  //   if (options.optimize !== false) {
  //     optimize(ast, options);
  //   }

  // 3.通过ast 重新生成代码
  // 我们最后生成的代码需要和render函数一样
  // 类似_c('div',{id:"app"},_c('div',undefined,_v("hello"+_s(name)),_c('span',undefined,_v("world"))))
  // _c代表创建元素 _v代表创建文本 _s代表文Json.stringify--把对象解析成文本
  let code = generate(ast)
  //   使用with语法改变作用域为this  之后调用render函数可以使用call改变this 方便code里面的变量取值
  let renderFn = new Function(`with(this){return ${code}}`)
  return renderFn
}
新建 compiler 文件夹 表示编译相关功能 核心导出 compileToFunctions 函数
主要有三个步骤
- 生成 ast
- 优化静态节点
- 根据 ast 生成 render 函数
3.解析 html 并生成 ast
javascript
// src/compiler/parse.js

// 以下为源码的正则  对正则表达式不清楚的同学可以参考小编之前写的文章(前端进阶高薪必看 - 正则篇);
const ncname = `[a-zA-Z_][\\-\\.0-9_a-zA-Z]*` //匹配标签名 形如 abc-123
const qnameCapture = `((?:${ncname}\\:)?${ncname})` //匹配特殊标签 形如 abc:234 前面的abc:可有可无
const startTagOpen = new RegExp(`^<${qnameCapture}`) // 匹配标签开始 形如 <abc-123 捕获里面的标签名
const startTagClose = /^\s*(\/?)>/ // 匹配标签结束  >
const endTag = new RegExp(`^<\\/${qnameCapture}[^>]*>`) // 匹配标签结尾 如 </abc-123> 捕获里面的标签名
const attribute = /^\s*([^\s"'<>\/=]+)(?:\s*(=)\s*(?:"([^"]*)"+|'([^']*)'+|([^\s"'=<>`]+)))?/ // 匹配属性  形如 id="app"

let root, currentParent //代表根节点 和当前父节点
// 栈结构 来表示开始和结束标签
let stack = []
// 标识元素和文本type
const ELEMENT_TYPE = 1
const TEXT_TYPE = 3
// 生成ast方法
function createASTElement(tagName, attrs) {
  return {
    tag: tagName,
    type: ELEMENT_TYPE,
    children: [],
    attrs,
    parent: null,
  }
}

// 对开始标签进行处理
function handleStartTag({ tagName, attrs }) {
  let element = createASTElement(tagName, attrs)
  if (!root) {
    root = element
  }
  currentParent = element
  stack.push(element)
}

// 对结束标签进行处理
function handleEndTag(tagName) {
  // 栈结构 []
  // 比如 <div><span></span></div> 当遇到第一个结束标签</span>时 会匹配到栈顶<span>元素对应的ast 并取出来
  let element = stack.pop()
  // 当前父元素就是栈顶的上一个元素 在这里就类似div
  currentParent = stack[stack.length - 1]
  // 建立parent和children关系
  if (currentParent) {
    element.parent = currentParent
    currentParent.children.push(element)
  }
}

// 对文本进行处理
function handleChars(text) {
  // 去掉空格
  text = text.replace(/\s/g, '')
  if (text) {
    currentParent.children.push({
      type: TEXT_TYPE,
      text,
    })
  }
}

// 解析标签生成ast核心
export function parse(html) {
  while (html) {
    // 查找<
    let textEnd = html.indexOf('<')
    // 如果<在第一个 那么证明接下来就是一个标签 不管是开始还是结束标签
    if (textEnd === 0) {
      // 如果开始标签解析有结果
      const startTagMatch = parseStartTag()
      if (startTagMatch) {
        // 把解析好的标签名和属性解析生成ast
        handleStartTag(startTagMatch)
        continue
      }

      // 匹配结束标签</
      const endTagMatch = html.match(endTag)
      if (endTagMatch) {
        advance(endTagMatch[0].length)
        handleEndTag(endTagMatch[1])
        continue
      }
    }

    let text
    // 形如 hello<div></div>
    if (textEnd >= 0) {
      // 获取文本
      text = html.substring(0, textEnd)
    }
    if (text) {
      advance(text.length)
      handleChars(text)
    }
  }

  // 匹配开始标签
  function parseStartTag() {
    const start = html.match(startTagOpen)

    if (start) {
      const match = {
        tagName: start[1],
        attrs: [],
      }
      //匹配到了开始标签 就截取掉
      advance(start[0].length)

      // 开始匹配属性
      // end代表结束符号>  如果不是匹配到了结束标签
      // attr 表示匹配的属性
      let end, attr
      while (!(end = html.match(startTagClose)) && (attr = html.match(attribute))) {
        advance(attr[0].length)
        attr = {
          name: attr[1],
          value: attr[3] || attr[4] || attr[5], //这里是因为正则捕获支持双引号 单引号 和无引号的属性值
        }
        match.attrs.push(attr)
      }
      if (end) {
        //   代表一个标签匹配到结束的>了 代表开始标签解析完毕
        advance(1)
        return match
      }
    }
  }
  //截取html字符串 每次匹配到了就往前继续匹配
  function advance(n) {
    html = html.substring(n)
  }
  //   返回生成的ast
  return root
}
利用正则 匹配 html 字符串 遇到开始标签 结束标签和文本 解析完毕之后生成对应的 ast 并建立相应的父子关联 不断的 advance 截取剩余的字符串 直到 html 全部解析完毕 咱们这里主要写了对于开始标签里面的属性的处理--parseStartTag
4.根据 ast 重新生成代码
javascript
// src/compiler/codegen.js

const defaultTagRE = /\{\{((?:.|\r?\n)+?)\}\}/g //匹配花括号 {{  }} 捕获花括号里面的内容

function gen(node) {
  // 判断节点类型
  // 主要包含处理文本核心
  // 源码这块包含了复杂的处理  比如 v-once v-for v-if 自定义指令 slot等等  咱们这里只考虑普通文本和变量表达式{{}}的处理

  // 如果是元素类型
  if (node.type == 1) {
    // 递归创建
    return generate(node)
  } else {
    // 如果是文本节点
    let text = node.text
    // 不存在花括号变量表达式
    if (!defaultTagRE.test(text)) {
      return `_v(${JSON.stringify(text)})`
    }
    // 正则是全局模式 每次需要重置正则的lastIndex属性  不然会引发匹配bug
    let lastIndex = (defaultTagRE.lastIndex = 0)
    let tokens = []
    let match, index

    while ((match = defaultTagRE.exec(text))) {
      // index代表匹配到的位置
      index = match.index
      if (index > lastIndex) {
        // 匹配到的{{位置  在tokens里面放入普通文本
        tokens.push(JSON.stringify(text.slice(lastIndex, index)))
      }
      // 放入捕获到的变量内容
      tokens.push(`_s(${match[1].trim()})`)
      // 匹配指针后移
      lastIndex = index + match[0].length
    }
    // 如果匹配完了花括号  text里面还有剩余的普通文本 那么继续push
    if (lastIndex < text.length) {
      tokens.push(JSON.stringify(text.slice(lastIndex)))
    }
    // _v表示创建文本
    return `_v(${tokens.join('+')})`
  }
}

// 处理attrs属性
function genProps(attrs) {
  let str = ''
  for (let i = 0; i < attrs.length; i++) {
    let attr = attrs[i]
    // 对attrs属性里面的style做特殊处理
    if (attr.name === 'style') {
      let obj = {}
      attr.value.split(';').forEach((item) => {
        let [key, value] = item.split(':')
        obj[key] = value
      })
      attr.value = obj
    }
    str += `${attr.name}:${JSON.stringify(attr.value)},`
  }
  return `{${str.slice(0, -1)}}`
}

// 生成子节点 调用gen函数进行递归创建
function getChildren(el) {
  const children = el.children
  if (children) {
    return `${children.map((c) => gen(c)).join(',')}`
  }
}
// 递归创建生成code
export function generate(el) {
  let children = getChildren(el)
  let code = `_c('${el.tag}',${el.attrs.length ? `${genProps(el.attrs)}` : 'undefined'}${children ? `,${children}` : ''})`
  return code
}
拿到生成好的 ast 之后 需要把 ast 转化成类似_c('div',{id:"app"},_c('div',undefined,_v("hello"+_s(name)),_c('span',undefined,_v("world"))))这样的字符串
5.code 字符串生成 render 函数
javascript
export function compileToFunctions(template) {
  let ast = parse(template)
  let code = generate(ast)
  // 使用with语法改变作用域为this  之后调用render函数可以使用call改变this 方便code里面的变量取值 比如 name值就变成了this.name
  let renderFn = new Function(`with(this){return ${code}}`)
  return renderFn
}
6.模板编译的思维导图
